Monday, October 24, 2016

[iOS | Cocoapods] duplicate symbol _OBJC_CLASS_$_PodsDummy_Pods_packager

Build multiple frameworks with cocoapods-packager, if you get the following error when integrating those frameworks into your project :

duplicate symbol _OBJC_CLASS_$_PodsDummy_Pods_packager in:
    /var/folders/4j/b_y7bj6n7qd7ttmw20nn4bww0000gn/T/CocoaPods/Lint/Pods/ABC/AAA.framework/AAA(Pods-packager-dummy.o)
    /var/folders/4j/b_y7bj6n7qd7ttmw20nn4bww0000gn/T/CocoaPods/Lint/Pods/DEF/DDD.framework/DDD(Pods-packager-dummy.o)


I'm not familiar with Ruby and it's difficult for me to find the reason and fix it. But here is a temporary solution, just to edit the following files to make sure the `-dummy.m` unique then re-package the framework:

$ sudo vi /Users/xiangwei/.rvm/rubies/ruby-2.2.3/lib/ruby/gems/2.2.0/gems/cocoapods-1.1.1/lib/cocoapods/target.rb +174


$ sudo vi /Users/xiangwei/.rvm/rubies/ruby-2.2.3/lib/ruby/gems/2.2.0/gems/cocoapods-1.1.1/lib/cocoapods/generator/dummy_source.rb +8

Tuesday, June 14, 2016

[iOS] How to zoom in iOS map more than zoom level 21

As we know you can only zoom in to zoom level 20 before iOS 9, zoom level 21 has been supported since iOS 9.

Actually you can zoom in the iOS map to zoom level 21 more,  in that case, the background map (building and road) will not be shown any more, but all labels are kept and the coordinate (latitude/longitude) system works properly on it as well, here is the steps to do it:

1. Add world wide overlay on top of map and road and bottom of labels
Overlay:
MKMapPoint corners[4];
        corners[0] = MKMapPointMake(MKMapRectGetMaxX(MKMapRectWorld), MKMapRectGetMaxY(MKMapRectWorld));
        corners[1] = MKMapPointMake(MKMapRectGetMinX(MKMapRectWorld), MKMapRectGetMaxY(MKMapRectWorld));
        corners[2] = MKMapPointMake(MKMapRectGetMinX(MKMapRectWorld), MKMapRectGetMinY(MKMapRectWorld));
        corners[3] = MKMapPointMake(MKMapRectGetMaxX(MKMapRectWorld), MKMapRectGetMinY(MKMapRectWorld));

        MKPolygon *instance = [MKPolygon polygonWithPoints:corners count:4];
Render:
MKPolygonRenderer *renderer = [[MKPolygonRenderer alloc] initWithPolygon:overlay];
        renderer.fillColor = [UIColor clearcolor];
        renderer.lineWidth = 0.0;

        renderer.strokeColor = renderer.fillColor

2. Add another overlay on top of it which can be zoom in/out (just like a PDF or something)


After finish that when you zoom in/out on the map you will see the altitude of camera could be as low as 6 meters, but the iOS map disappears once the altitude of camera less about 202 meters.

[iOS] Convert a PDF to Image

Drawing PDF is piece of cake, not much CUP and Memory, but drawing a bitmap image that's memory consuming thing, so please be careful when you covert it on a iPhone.

1. Covert a PDF to image
-(NSData *)extractFromPdf:(NSURL *)url forRect:(CGRect)rect {
    //===============================================================
    // Load the PDF in memory once
    //===============================================================
    if (![url.absoluteString isEqualToString:self.pdfUrl.absoluteString]) {
        [self releasePdfResource];
    
        CGPDFDocumentRef pdfRef = CGPDFDocumentCreateWithURL((__bridge CFURLRef)url);
        if (CGPDFDocumentGetNumberOfPages(pdfRef) == 0) {
            CGPDFDocumentRelease(pdfRef);
            return nil;
        }
        
        self.pdfUrl = url;
        pdf = pdfRef;
        pdfPage = CGPDFDocumentGetPage(pdfRef, 1);
    }
    
    //===============================================================
    // Draw PDF to layer
    //===============================================================
    CGSize layerSize = CGSizeMake(rect.origin.x + rect.size.width, rect.origin.y + rect.size.height);
    CGContextRef bitmapContext = PWCreateBitmapContext(rect.size.width, rect.size.height);
    CGLayerRef layer = CGLayerCreateWithContext(bitmapContext, layerSize, NULL);
    CGContextRef layerContext = CGLayerGetContext(layer);
    CGContextSaveGState (layerContext);
    CGContextDrawPDFPage(layerContext, pdfPage);
    CGContextRestoreGState (layerContext);
    
    // Draw layer to bitmap
    CGContextSaveGState (bitmapContext);
    CGRect tileRect = CGRectMake(-rect.origin.x,
                                 -rect.origin.y,
                                 rect.origin.x + rect.size.width,
                                 rect.origin.y + rect.size.height);
    
    CGContextDrawLayerInRect(bitmapContext, tileRect, layer);
    CGLayerRelease(layer);
    CGContextRestoreGState (bitmapContext);

    //===============================================================
    // Release
    //===============================================================
    CGImageRef bitmap = CGBitmapContextCreateImage(bitmapContext);
    UIImage *image = [UIImage imageWithCGImage:bitmap];
    CGImageRelease(bitmap);
    CGContextRelease (bitmapContext);
    
    NSData *imageData = UIImagePNGRepresentation(image);
    return imageData;

}


2. Covert a PDF to image with scale and rotation

-(NSData *)extractFromPdf:(NSURL *)url
                  forRect:(CGRect)rect
         withScalePdfSize:(CGSize)scalePdfSize
            rotationAngle:(float)rotation {
    //===============================================================
    // Load the PDF in memory once
    //===============================================================
    if (![url.absoluteString isEqualToString:self.pdfUrl.absoluteString]) {
        [self releasePdfResource];
    
        CGPDFDocumentRef pdfRef = CGPDFDocumentCreateWithURL((__bridge CFURLRef)url);
        if (CGPDFDocumentGetNumberOfPages(pdfRef) == 0) {
            CGPDFDocumentRelease(pdfRef);
            return nil;
        }
        
        self.pdfUrl = url;
        pdf = pdfRef;
        pdfPage = CGPDFDocumentGetPage(pdfRef, 1);
    }
    
    //===============================================================
    // Prepare affine transform
    //===============================================================
    CGRect originalPdfRect = CGPDFPageGetBoxRect(pdfPage, kCGPDFCropBox);
    CGFloat scaleFactorWidth = scalePdfSize.width/originalPdfRect.size.width;
    CGFloat scaleFactorHeight = scalePdfSize.height/originalPdfRect.size.height;
    /*
     x
     |
     |
     |**************
     |*            *
     |*            *
     |*            *
     |**************------y
     (0, 0)
     
     After rotate, move left with a distance of sin(angle)*height
                *
              *   *
           |*       *
          *|          *
        *  |        *
      *    |      *
        *  |    *
         * |  * (angle)
     -+++++*--------------y
           (0, 0)
     */
    CGAffineTransform centerTransform;
    double angle = rotation * M_PI / 180;
    if (rotation < 0) {
        centerTransform = CGAffineTransformMakeTranslation(-sin(angle)*originalPdfRect.size.height*scaleFactorHeight, 0);
    } else {
        centerTransform = CGAffineTransformMakeTranslation(0, sin(angle)*originalPdfRect.size.width*scaleFactorWidth);
    }
    CGAffineTransform rotateTransform = CGAffineTransformRotate(centerTransform, -angle);
    CGAffineTransform scaleTransform = CGAffineTransformScale(rotateTransform, scaleFactorWidth, scaleFactorHeight);
    
    //===============================================================
    // Create bitmap context and alloc the size of memory
    //===============================================================
    int pixelsWide = rect.size.width+rect.origin.x;
    int pixelsHigh = rect.size.height+rect.origin.y;
    CGContextRef bitmapContext = PWCreateBitmapContext(pixelsWide, pixelsHigh);
    if (bitmapContext== NULL) {
        return NULL;
    }
    
    //===============================================================
    // Draw PDF to layer
    //===============================================================
    CGLayerRef layer = CGLayerCreateWithContext(bitmapContext, rect.size, NULL);
    CGContextRef layerContext = CGLayerGetContext(layer);
    CGContextSaveGState (layerContext);
    CGContextConcatCTM(layerContext, scaleTransform);
    CGContextDrawPDFPage(layerContext, pdfPage);
    CGContextRestoreGState (layerContext);
    
    // Draw layer to bitmap
    CGContextSaveGState (bitmapContext);
    CGContextDrawLayerInRect(bitmapContext, rect, layer);
    CGContextRestoreGState (bitmapContext);
    
    //===============================================================
    // Release
    //===============================================================
    CGLayerRelease(layer);
    CGImageRef bitmap = CGBitmapContextCreateImage(bitmapContext);
    UIImage *image = [UIImage imageWithCGImage:bitmap];
    NSData *imageData = UIImagePNGRepresentation(image);
    CGImageRelease(bitmap);
    CGContextRelease (bitmapContext);
    
    return imageData;
}


Thursday, May 26, 2016

[iOS] Quartz 2D Programming Guide - Note

These graphics contexts are available to your application:


  • bitmap graphics context allows you to paint RGB colors, CMYK colors, or grayscale into a bitmap. A bitmap is a rectangular array (or raster) of pixels, each pixel representing a point in an image. Bitmap images are also called sampled images. See Creating a Bitmap Graphics Context.
  • PDF graphics context allows you to create a PDF file. In a PDF file, your drawing is preserved as a sequence of commands. There are some significant differences between PDF files and bitmaps:
    • PDF files, unlike bitmaps, may contain more than one page.
    • When you draw a page from a PDF file on a different device, the resulting image is optimized for the display characteristics of that device.
    • PDF files are resolution independent by nature—the size at which they are drawn can be increased or decreased infinitely without sacrificing image detail. The user-perceived quality of a bitmap image is tied to the resolution at which the bitmap is intended to be viewed.
  • window graphics context is a graphics context that you can use to draw into a window. Note that because Quartz 2D is a graphics engine and not a window management system, you use one of the application frameworks to obtain a graphics context for a window. See Creating a Window Graphics Context in Mac OS X for details.
  • layer context (CGLayerRef) is an offscreen drawing destination associated with another graphics context. It is designed for optimal performance when drawing the layer to the graphics context that created it. A layer context can be a much better choice for offscreen drawing than a bitmap graphics context. See Core Graphics Layer Drawing.
  • When you want to print in Mac OS X, you send your content to a PostScript graphics context that is managed by the printing framework. SeeObtaining a Graphics Context for Printing for more information.


The opaque data types available in Quartz 2D include the following:

Graphics States

The graphics context contains a stack of graphics states. When Quartz creates a graphics context, the stack is empty. When you save the graphics state, Quartz pushes a copy of the current graphics state onto the stack. When you restore the graphics state, Quartz pops the graphics state off the top of the stack. The popped state becomes the current graphics state.
To save the current graphics state, use the function CGContextSaveGState to push a copy of the current graphics state onto the stack. To restore a previously saved graphics state, use the function CGContextRestoreGState to replace the current graphics state with the graphics state that’s on top of the stack.
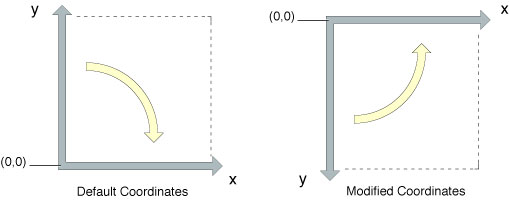
Quartz 2D Coordinate Systems
  • In Mac OS X, a subclass of NSView that overrides its isFlipped method to return YES.
  • In iOS, a drawing context returned by an UIView.
  • In iOS, a drawing context created by calling the UIGraphicsBeginImageContextWithOptions function.
Rotation
To draw a box rotated by 45 degrees, you rotate the coordinate system of the page (the CTM) before you draw the box. Quartz draws to the output device using the rotated coordinate system.


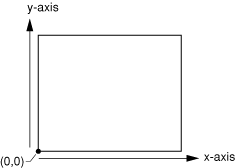
The Quartz coordinate system
Modifying the coordinate system creates a mirrored image
The reason UIKit returns Quartz drawing contexts with modified coordinate systems,to do this, apply a transform that translates the origin to the upper-left corner of the PDF context and scales the y-coordinate by -1.
In iOS, if you use a UIImageobject to wrap a CGImage object you create, you do not need to modify the CTM. The UIImage object automatically compensates for the modified coordinate system applied by UIKit.


Modifying the Current Transformation Matrix

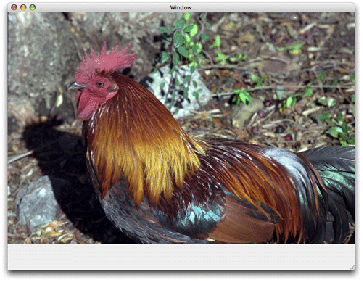
CGContextDrawImage (myContext, rect, myImage);


Figure 5-2  An image that is not transformed
An image that is not transformed

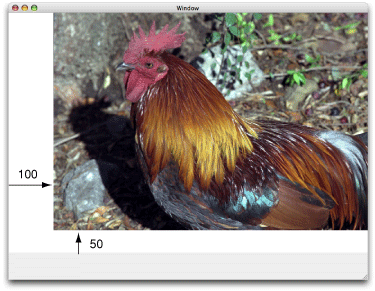
Translation moves the origin of the coordinate space by the amount you specify for the x and y axes. You call the function CGContextTranslateCTM to modify the x and y coordinates of each point by a specified amount. Figure 5-3 shows an image translated by 100 units in the x-axis and 50 units in the y-axis, using the following line of code:
CGContextTranslateCTM (myContext, 100, 50);


Figure 5-3  A translated image
A translated image

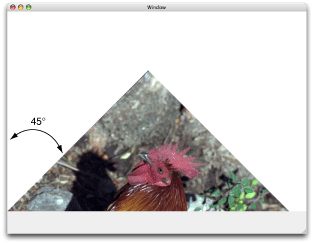
Rotation moves the coordinate space by the angle you specify. You call the function CGContextRotateCTM to specify the rotation angle, in radians.Figure 5-4 shows an image rotated by –45 degrees about the origin, which is the lower left of the window, using the following line of code:
CGContextRotateCTM (myContext, radians(–45.));
The image is clipped because the rotation moved part of the image to a location outside the context. You need to specify the rotation angle in radians.
It’s useful to write a radians routine if you plan to perform many rotations.
#include <math.h>
static inline double radians (double degrees) {return degrees * M_PI/180;}


Figure 5-4  A rotated image
A rotated image

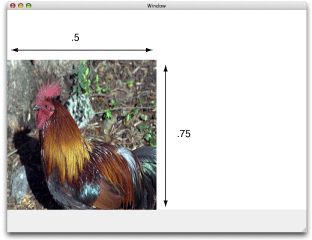
Scaling changes the scale of the coordinate space by the x and y factors you specify, effectively stretching or shrinking the image. The magnitude of the x and y factors governs whether the new coordinates are larger or smaller than the original. In addition, by making the x factor negative, you can flip the coordinates along the x-axis; similarly, you can flip coordinates horizontally, along the y-axis, by making the y factor negative. You call the functionCGContextScaleCTM to specify the x and y scaling factors. Figure 5-5 shows an image whose x values are scaled by .5 and whose y values are scaled by .75, using the following line of code:
CGContextScaleCTM (myContext, .5, .75);


Figure 5-5  A scaled image
A scaled image

Concatenation combines two matrices by multiplying them together. You can concatenate several matrices to form a single matrix that contains the cumulative effects of the matrices. You call the function CGContextConcatCTM to combine the CTM with an affine transform. Affine transforms, and the functions that create them, are discussed in Creating Affine Transforms.
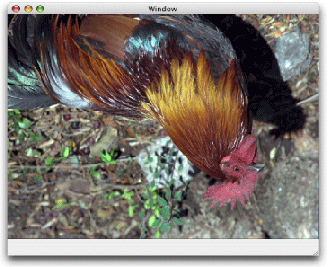
Another way to achieve a cumulative effect is to perform two or more transformations without restoring the graphics state between transformation calls.Figure 5-6 shows an image that results from translating an image and then rotating it, using the following lines of code:
CGContextTranslateCTM (myContext, w,h);
CGContextRotateCTM (myContext, radians(-180.));


Figure 5-6  An image that is translated and rotated
An image that is translated and rotated

Rotation Affine Transform

CGAffineTransform centerTransform = CGAffineTransformMakeTranslation(scaleSize.width/2, scaleSize.height/2);
    CGAffineTransform rotateTransform = CGAffineTransformRotate(centerTransform, -(rotation * M_PI / 180));
    CGAffineTransform recenterTransform = CGAffineTransformTranslate(rotateTransform, -scaleSize.width/2, -scaleSize.height/2);
    CGAffineTransform finalTransform = CGAffineTransformScale(recenterTransform,
                                                              scaleSize.width/originalPdfRect.size.width,
                                                         scaleSize.height/originalPdfRect.size.height);

http://stackoverflow.com/questions/15696850/cgcontext-rotate-rectangle